
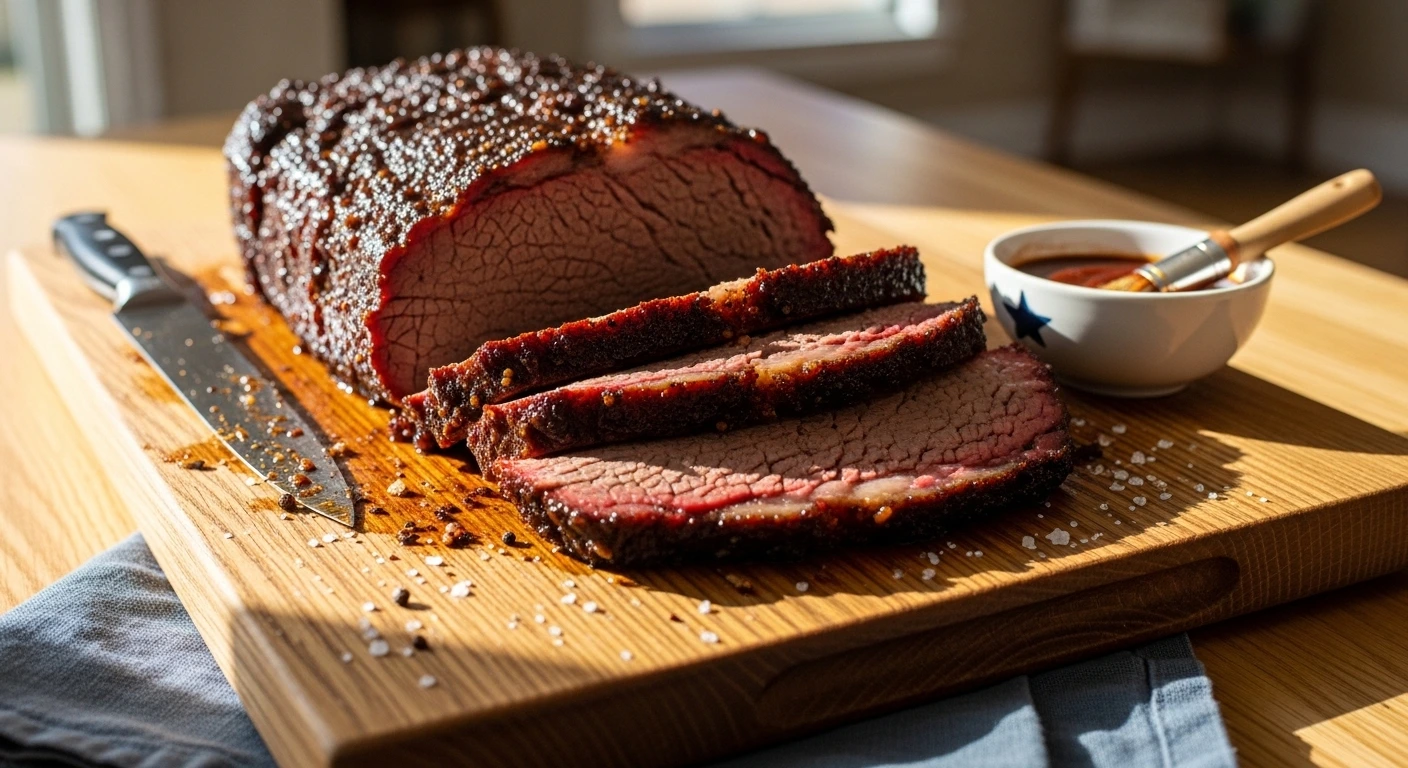
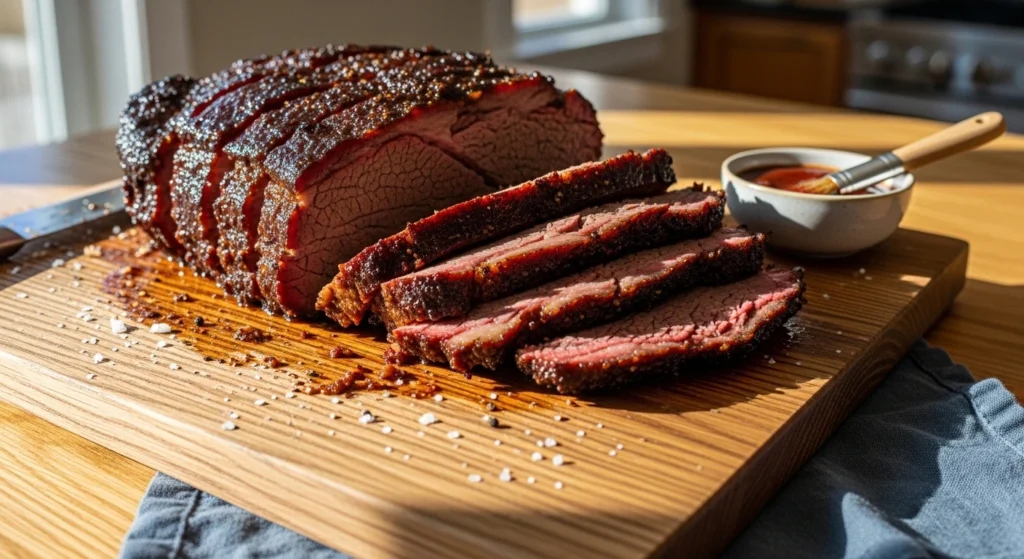
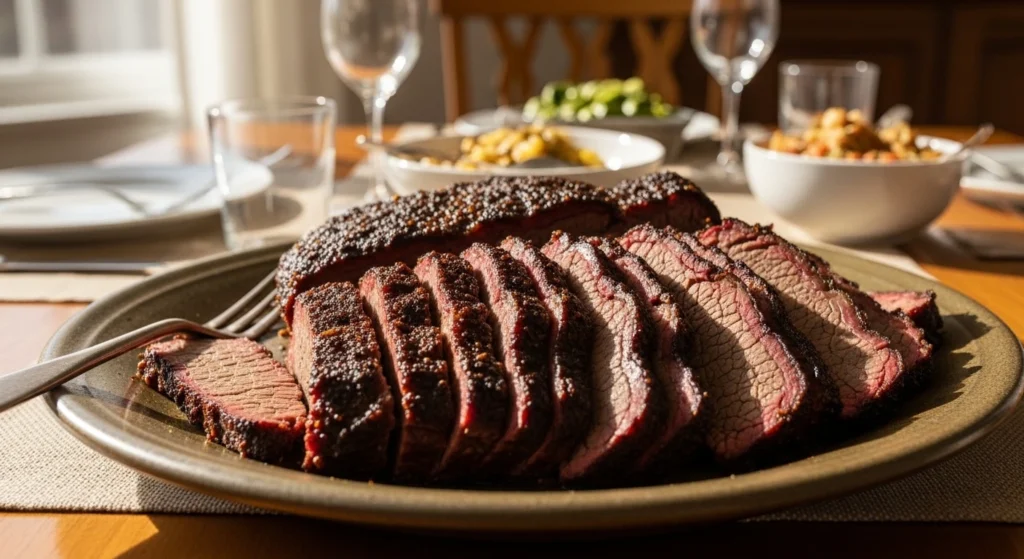
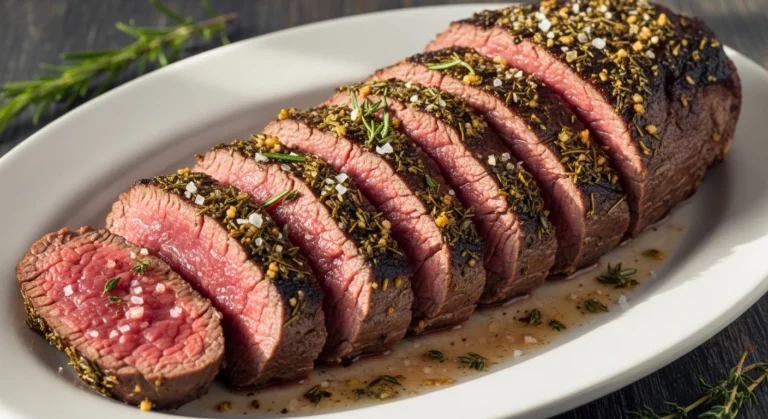
There is nothing quite like a tender, melt-in-your-mouth Oven Baked Beef Brisket to bring the whole family running to the dinner table. It is the ultimate comfort food for any season.
Years ago, I was intensely craving authentic, deep-flavored barbecue. The problem was, the weather was miserable, and I did not have the time or energy to babysit an outdoor smoker all day.
I decided to experiment with my standard kitchen oven. I wanted to see if I could replicate that glorious, pull-apart texture using a low-and-slow indoor method.
When I finally nailed this technique, my family was completely obsessed. It instantly became a household staple, bringing the same level of savory comfort as our favorite oven roasted country style pork ribs.
Let me show you exactly how to achieve that gorgeous caramelized bark and incredibly juicy center. You do not need any fancy equipment to make this masterpiece!
Table of Contents
Why You’ll Love This Oven Baked Beef Brisket
Cooking a large cut of beef can feel a little intimidating at first. However, this recipe is incredibly forgiving and practically foolproof.
It delivers the authentic taste of a Texas-style smoked brisket in oven, without requiring any special wood chips or a heavy outdoor pit.
Here is exactly why this recipe will become your new weekend favorite:
- Hands-off cooking: Once the meat goes into the oven, your work is completely done for the next several hours.
- Incredible leftovers: This makes a massive amount of food, and the flavors actually deepen and improve the next day.
- Melt-in-your-mouth texture: Cooking it low and slow guarantees a truly tender oven brisket that falls apart beautifully.
- Pantry-staple rub: You likely have every single spice needed for this incredible dry rub sitting in your cabinet right now.
Ingredients You Need
A spectacular slow roasted brisket does not require complicated or expensive ingredients. It is all about letting the beef and a few robust spices do the heavy lifting.
Here is what you need to gather to get started:
- Beef Brisket: You will need a 4 to 5-pound brisket. Try to find one with a thick, even layer of white fat on the top (known as the fat cap). If you are curious about the difference between the “flat” and the “point” cuts at the butcher, the culinary experts at Serious Eats have a fantastic guide to brisket anatomy.
- Dark Brown Sugar: This is the base of our beef brisket dry rub recipe. It caramelizes in the oven, creating that sticky, dark, gorgeous bark on the outside.
- Smoked Paprika: Since we are not using a real smoker, smoked paprika is essential to cheat that authentic, wood-fired flavor.
- Coarse Salt & Black Pepper: The absolute pillars of any good Texas barbecue rub. Use coarse kosher salt for the best texture.
- Garlic & Onion Powder: These aromatics add deep, savory notes that penetrate right into the meat.
- Cumin & Coriander: This warm spice duo adds an earthy, complex flavor profile to the crust.
- Cayenne Pepper: Just a teaspoon adds a tiny background kick to balance the sweetness of the brown sugar.
Step-by-Step Instructions
Do not let the long cooking time intimidate you. The actual active prep time for this recipe is barely fifteen minutes.
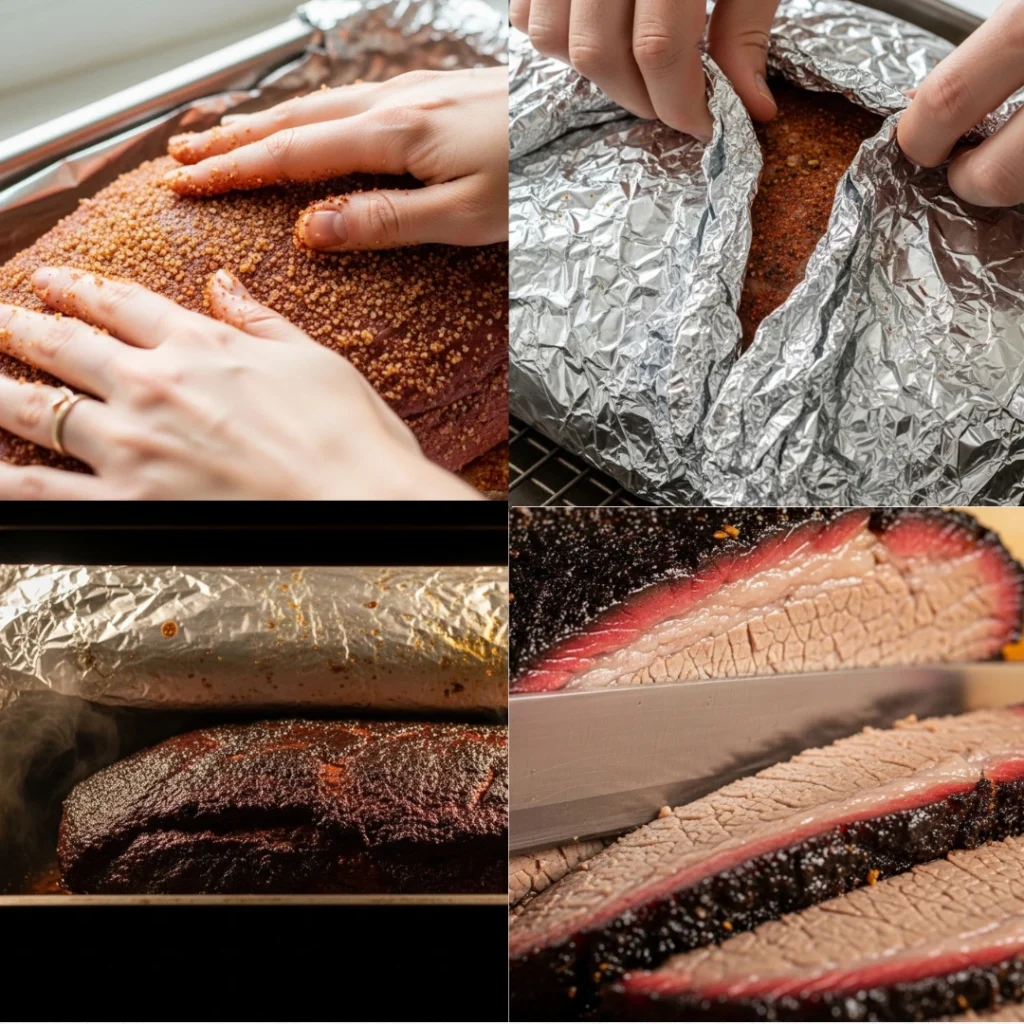
Step 1: Make the dry rub. In a small mixing bowl, whisk together your brown sugar, smoked paprika, coarse salt, black pepper, garlic powder, onion powder, cumin, coriander, and cayenne pepper.
Step 2: Prep the beef. Lay your brisket on a large, clean cutting board. Use paper towels to firmly pat the entire piece of meat completely dry. This helps the spices stick.
Step 3: Coat the brisket. Generously apply your dry rub all over the brisket. Massage it deeply into the meat, ensuring every single inch is covered.
Step 4: Wrap and chill. Tightly wrap the seasoned brisket in a double layer of aluminum foil. Place it in a baking dish and let it rest in the refrigerator for at least 10 hours, or overnight.
Step 5: Bring to room temp. The next day, pull the wrapped brisket out of the fridge. Let it sit on the counter for one hour to take the chill off before baking.
Step 6: Prepare the roasting pan. Preheat your oven to 300°F. Place a wire rack inside a large roasting pan. Lay a large “X” of heavy-duty aluminum foil over the rack.
Step 7: The foil wrap method. Place the seasoned brisket in the center of the foil cross, ensuring the fat cap is facing up. Tightly wrap the foil up and around the meat, creating a sealed packet. Cooking brisket in foil is the secret to locking in all that amazing moisture!
Step 8: Bake low and slow. Place the pan in the oven. Bake for 1 hour and 15 minutes per pound of meat (about 5 to 6 hours for a standard cut).
Step 9: Uncover and caramelize. Once the internal temperature hits 180°F, carefully open the top of the foil packet. Return it to the oven uncovered for another 45 minutes to let the bark darken and crisp up.
Step 10: Rest and slice. Remove the pan when the meat hits 195°F to 200°F. Tent it loosely with foil and let it rest for 30 full minutes before slicing.
Pro Tips for Perfect Results
Want to guarantee your brisket turns out incredibly juicy and flavorful? Keep these simple kitchen rules in mind.
Always cook fat-side up. As the brisket roasts, the top layer of fat will slowly melt down over the sides. This naturally and continuously bastes the beef, keeping it incredibly moist.
Be incredibly patient. Brisket is a tough, hardworking muscle. It absolutely must be cooked at a low temperature for a long time to allow the tough connective tissues to break down into tender gelatin.
Do not skip the resting phase. If you slice the meat the second it comes out of the oven, all the savory juices will immediately run out onto your cutting board, leaving you with dry beef. Let it rest!
Common Mistakes to Avoid
Even an easy recipe can go wrong if you rush the process. Avoid these common mistakes for the best barbecue experience.
Trimming off all the fat. Fat equals flavor and moisture. If you buy a brisket and aggressively carve off all the white fat on top, your meat will dry out and turn into shoe leather in the oven.
Turning up the heat to save time. Never try to speed this recipe up by cranking your oven to 400°F. High heat will instantly seize the muscle fibers, resulting in a terribly tough, chewy dinner.
Slicing with the grain. This is the biggest mistake you can make! If you cut parallel to the muscle fibers, the meat will be incredibly stringy and hard to chew. Always slice perpendicular to the lines in the meat.
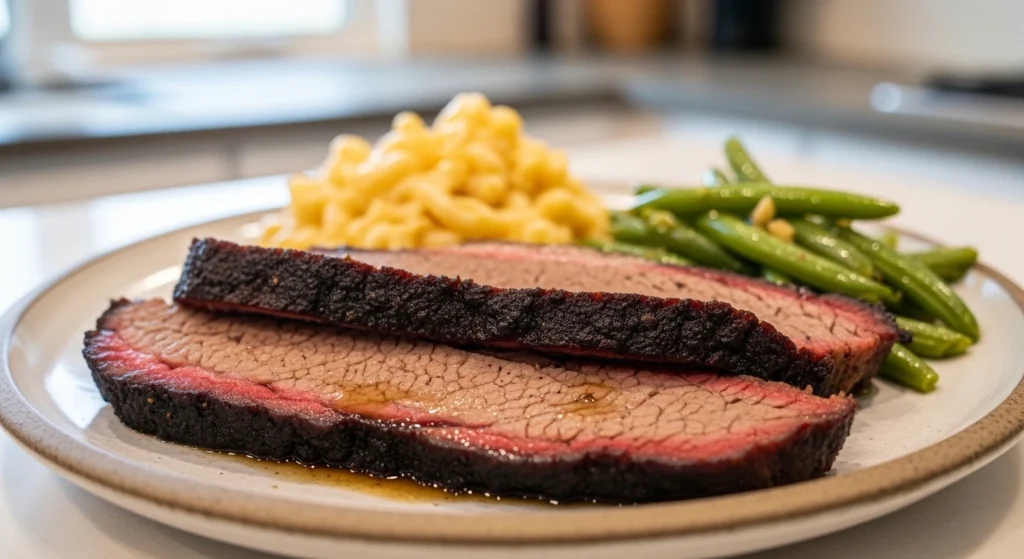
Serving Ideas
This magnificent brisket deserves to be the absolute star of your dinner table.
I love serving this with classic Southern barbecue sides. Think creamy macaroni and cheese, tangy vinegar coleslaw, and a massive skillet of warm jalapeño cornbread.
If you are hosting a huge summer blowout or a neighborhood block party, you can easily build an epic meat platter. Serve this brisket alongside a massive pile of seasoned crispy chicken drumsticks.
Want to offer your guests even more variety? Fire up the barbecue out back and throw on a few juicy grilled pork chops to complete the ultimate backyard feast!
Storage & Make-Ahead Tips
This recipe is an absolute dream for meal prepping because the flavors genuinely taste better the second day.
How to store: Allow any leftover brisket to cool completely to room temperature. Place the slices and any pan juices into an airtight container and store in the refrigerator for up to 3 days.
How to reheat: To prevent the meat from drying out, place your slices on a piece of aluminum foil. Drizzle a little beef broth or leftover pan drippings over the meat, wrap tightly, and warm in a 350°F oven for 15-20 minutes.
How to freeze: You can freeze leftover brisket beautifully! Place the cooled slices in a heavy-duty freezer bag, press out all the air, and freeze for up to 3 months. Thaw overnight in the fridge before reheating.
How long does it take to cook a brisket in the oven at 300 degrees?
At 300°F, you should plan to bake your brisket for about 1 hour and 15 minutes per pound, wrapped tightly in aluminum foil. For a standard 4 to 5-pound brisket, this will take around 5 to 6 hours total to reach the perfect, tender internal temperature of 195°F to 200°F.
Do I need to add liquid like beef broth to the roasting pan?
No additional liquid is required for this recipe! As long as you cook the brisket fat-side up and wrap it tightly in aluminum foil, the fat cap will render down and naturally baste the meat, keeping it incredibly moist and juicy without needing extra broth or water.
Should I trim the fat off my brisket before baking?
You should not trim all the fat off! While you can trim any extremely uneven or loose pieces, you want to leave a nice layer of fat (the fat cap) on top of the brisket. This fat is essential for keeping the meat moist and infusing it with rich beefy flavor during the long, slow cooking process.
How do I know when my oven-baked brisket is done?
The best way to check for doneness is by using a digital meat thermometer inserted into the thickest part of the brisket. You are looking for a final internal temperature between 195°F and 200°F for that perfect, fall-off-the-bone tenderness. This specific temperature range is crucial because it allows the tough collagen in the beef to fully break down into rich, juicy gelatin (you can read more about the science of cooking tough cuts of meat here).
Final Thoughts
I am so incredibly excited for you to try making this Oven Baked Beef Brisket at home. It truly proves that you do not need a fancy outdoor setup to make incredible barbecue!
Whether you are hosting a Sunday family dinner or meal-prepping for a busy week, this recipe is guaranteed to bring a smile to everyone’s face.
If you make this recipe, I would absolutely love to hear how it turned out! Please leave a comment and rate the recipe down below.
Do not forget to snap a quick photo and share it on your favorite Pinterest recipe boards so you always have this meal saved for later!
For more easy, comforting, and family-friendly recipes sent directly to your inbox, be sure to sign up for the free EndRecipes newsletter today!
PrintThe Absolute Best Oven Baked Beef Brisket
This oven-cooked beef brisket gives you the taste of Texas-style smoked brisket, without an actual smoker. A juicy beef brisket is coated with a tasty dry rub and then baked in the oven until tender and juicy.
- Prep Time: 15 minutes
- Cook Time: 5 hours 30 minutes
- Total Time: 5 hours 45 minutes
- Yield: 8 servings
Ingredients
-
4–5 lb beef brisket (with fat cap intact)
-
4 tablespoons dark brown sugar
-
4 tablespoons smoked paprika
-
2 tablespoons coarse kosher salt
-
1 tablespoon ground black pepper
-
2 teaspoons onion powder
-
2 teaspoons garlic powder
-
1 teaspoon ground cumin
-
1 teaspoon ground coriander
-
1 teaspoon cayenne pepper
Instructions
-
Prep the Rub: In a small bowl, mix together the brown sugar, smoked paprika, salt, pepper, onion powder, garlic powder, cumin, coriander, and cayenne.
-
Season the Beef: Pat the brisket completely dry with paper towels. Rub the spice mixture aggressively all over every side of the meat.
-
Chill Overnight: Wrap the seasoned brisket tightly in two layers of aluminum foil. Place in a baking dish and refrigerate for at least 10 hours or overnight.
-
Bring to Temp: Remove from the fridge, unwrap, and let the meat sit at room temperature for 1 hour.
-
Prep Oven: Preheat the oven to 300°F. Place a wire rack inside a large roasting pan. Lay a large “X” of heavy-duty foil over the rack.
-
Wrap for Baking: Place the brisket in the center of the foil, fat-side up. Tightly seal the foil around the meat.
-
Bake: Bake for 1 hour and 15 minutes per pound (until the internal temperature reaches 180°F).
-
Caramelize: Carefully open the top of the foil packet to expose the meat. Bake uncovered for another 45 minutes, or until the internal temperature reaches 195°F to 200°F.
-
Rest and Serve: Remove from the oven. Tent loosely with foil and let it rest for 30 minutes. Slice against the grain and serve warm!
Notes
Do NOT try to cook this faster at a higher temperature. The brisket will turn out dry and tough. You must be patient when cooking a brisket, it takes a low and slow cooking approach to allow the meat to tenderize.

One Comment
Comments are closed.